Kubernetes에 Microservice 배포하기 3편 - Canary Deployments with Istio
안녕하세요, DevOps 팀의 Sammie입니다. 저번 글 - Kubernetes Microservice 배포하기 2편에서는 Spinnaker pipeline을 쉽게 생성 할 수 있도록 Hyperconnect 내부에서 개발하여 사용하고 있는 도구에 대해 소개했습니다. 이번 글에서는 이 도구와 Istio[1]를 사용하여 쉽게 canary 배포를 할 수 있도록 설정한 방법에 대해 공유하려고 합니다.
저번 글을 읽지 않으셨거나, Istio를 전혀 모르고 계신다면 이 글을 이해하기 어려울 수 있어 양해 부탁드립니다. 또한, 이 글에서는 Istio가 지원하는 다양한 기능 중 canary 배포 설명에 필요한 최소한의 내용만 설명합니다. Istio의 전반적인 소개, 설치 방법이나 세부적인 내용은 공식 홈페이지 또는 다른 좋은 글을 참고하시기 바랍니다. 이 글의 모든 Istio 관련 내용은 1.4~1.6에서 테스트했으며, 다른 버전에서는 작동하지 않을 수 있습니다.
Objective
본격적인 pipeline 소개에 앞서, Hyperconnect에서 필요한 canary 배포를 설명하겠습니다. Canary라는 이름을 공유하지만, 아래와 같이 서로 다른 2가지의 배포 방법이 필요합니다. 쉬운 설명을 위해 hello-app[2]이라는 microservice 버전을 v1에서 v2로 올린다고 가정하겠습니다.
Canary Deploy
Requirements
- v1을 v2로 완전히 배포하지만, v2로 유입되는 traffic을 천천히 늘려가야 합니다.
- 배포 중 오류가 발생하면 자동으로 rollback 되어야 합니다.
- 오류가 발생하지 않고 모든 과정이 끝나면, v2로 100%의 traffic이 유입되고 있어야 합니다.
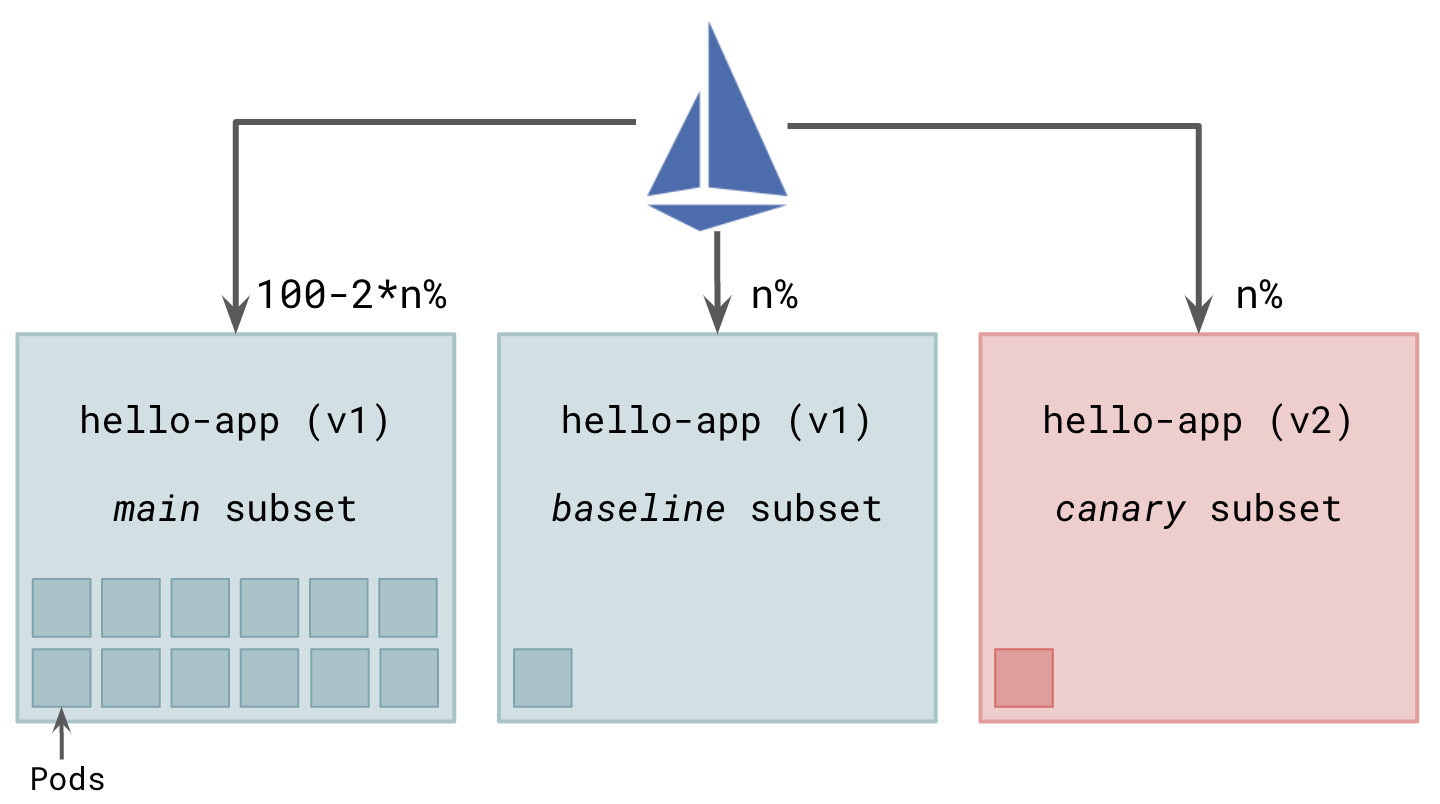
Canary Deploy에서는 main, canary 및 baseline의 3개 subset을 사용하며, 각각의 역할은 다음과 같습니다.
- main (v1): 이미 배포되어 100%의 traffic을 받는 v1 Pod 그룹입니다. 배포 과정이 성공적으로 끝나면 그룹 내의 모든 Pod이 v2가 되며 다시 100%의 traffic을 받게 됩니다.
- canary (v2): Canary pod의 그룹입니다. 전체 traffic의
n%를 유입시키며 각종 지표를 비교합니다. - baseline (v1): Canary subset의 지표를 비교하기 위해 생성한 v1 Pod 그룹입니다. Canary subset과 지표를 비교해야 하므로 전체 traffic의
n%를 넣습니다.
Deploy Step
- Baseline과 canary subset을 배포합니다.
n%의 traffic을 각각 baseline과 canary subset에 전달합니다. main subset은 당연히100-2*n%의 traffic을 받습니다.
- 이제 baseline과 canary subset의 metric을 비교합니다. 둘 다
n%의 동일한 traffic을 받으며, 버전만 다르기 때문에 모든 metric은 동등해야 합니다. 이 과정은 사람이 직접 하거나, 자동으로 수행할 수 있습니다. - 문제가 없으면
n을 조금씩 올리며 2~3단계를 반복합니다. 이때, traffic을 처리하는 데 문제가 없도록 baseline과 canary subset의 Pod 개수를 잘 조절해야 합니다.
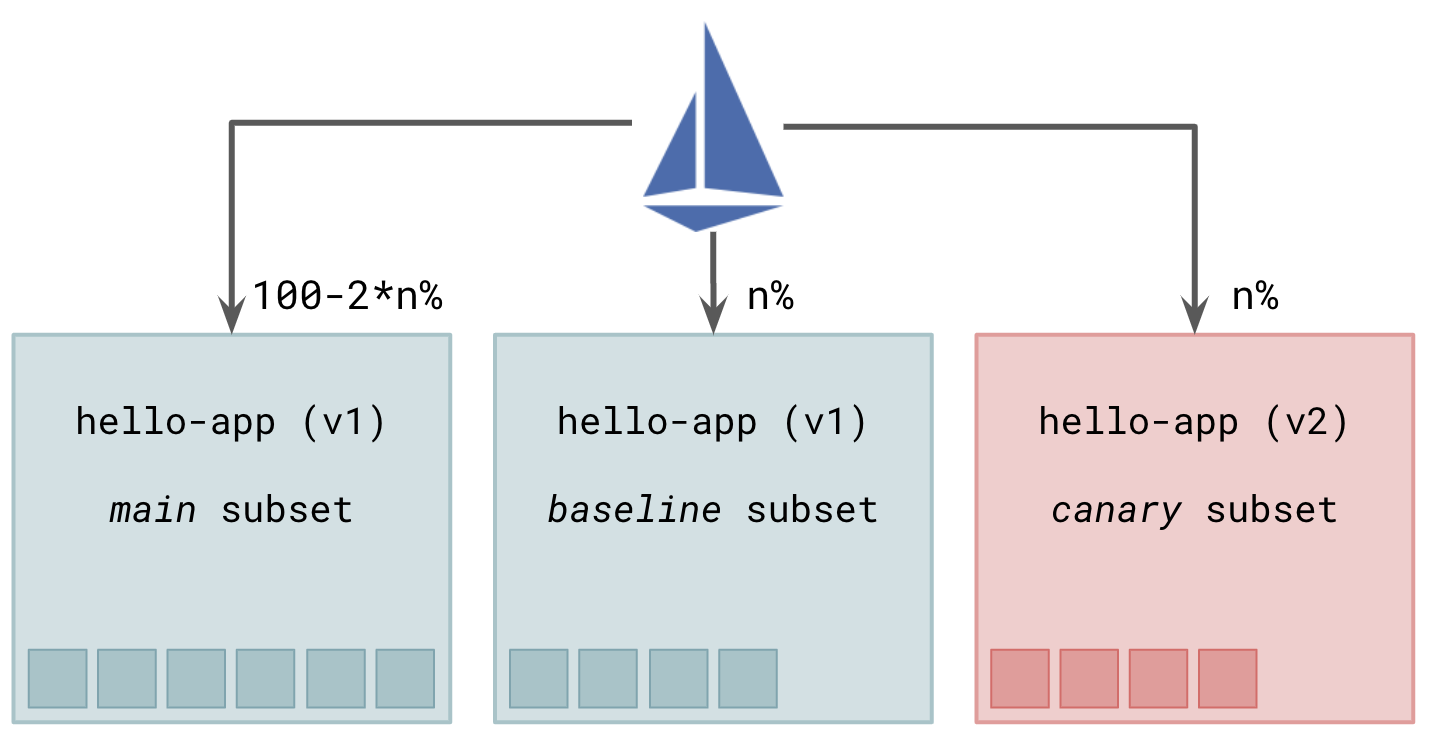
n을 50%까지 올립니다. 이 단계가 되면 main subset은 traffic을 받지 않으며, baseline과 canary subset이 각각 50%씩 traffic을 받습니다.

- 50%에서도 문제가 없으면, main subset을 v2로 update한 뒤 main subset에 100%의 traffic을 전달합니다.
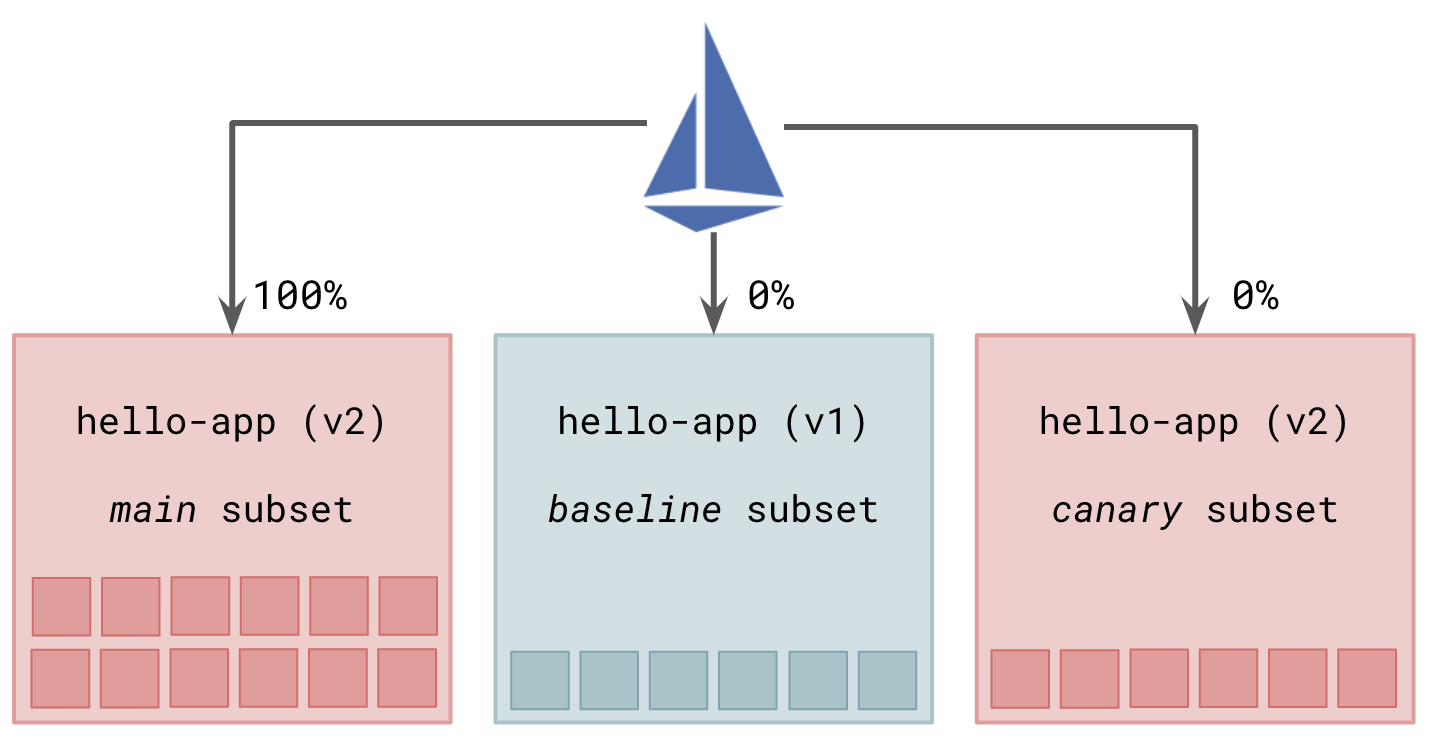
- 마지막으로 baseline subset과 canary subset을 삭제합니다.

FAQ
Q. 왜 baseline subset을 사용하나요? Canary subset과 main subset의 지표를 비교하면 되지 않나요?
A. Canary subset과 main subset에 유입되는 traffic이 다르므로 metric의 올바른 비교가 힘들어(귀찮아)집니다. Traffic 비율을 곱하거나 나누어서 비교해야 하고, non-linear 하게 달라지는 metric이 있다면 비교하기 더 힘들어집니다.
Q. 왜 subset의 Pod 개수를 중간에 조절하나요? 처음부터 baseline과 canary subset의 Pod 개수를 각각 main subset의 Pod 개수로 배포하면 안 되나요?
A. 당연히 가능하지만, 돈이 많이 들어갑니다. 다만, 배포 시간이 짧거나, Pod의 개수가 적고 Kubernetes node autoscaler[3]가 잘 구축되어 있다면 재정적으로도 큰 문제가 없을 것입니다.
Canary Test
Requirements
- 소량의 (보통 10% 이내, 최대 50%) traffic만 v2에 넣어보는 실험을 하고 싶습니다.
- 실험이 끝나면 실험 전과 동일한 상태(v1에 100%의 traffic)가 됩니다.
- 몇 %의 traffic을 v2에 넣을지, 얼마 동안 실험할지 자유롭게 설정할 수 있어야 합니다.
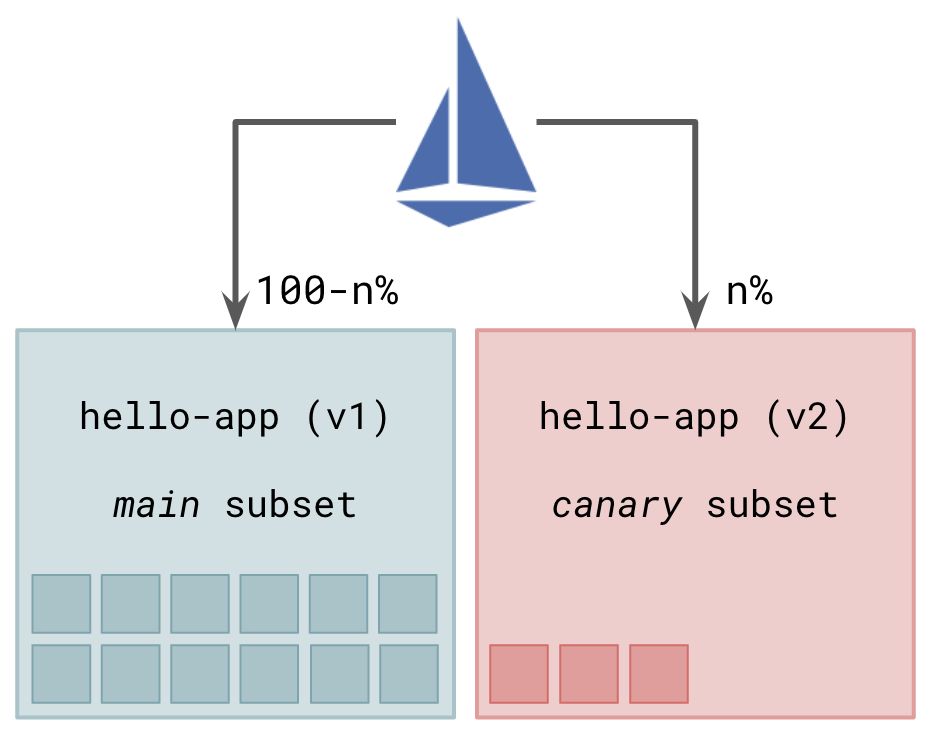
Canary Test는 작업의 성격상 자동화가 불가능하며, 사용자가 직접 metric과 log를 분석하므로 baseline subset을 두지 않고, main과 canary의 2개 subset으로 분할합니다. main은 v1, canary는 v2를 사용합니다.
Objective
- 사용자가 몇 %의 traffic을 canary subset에 넣을지 정하여 UI에 입력하고, 이를 적용합니다.
- 사용자가 metric과 log를 관찰합니다.
- Traffic 유입량을 줄이거나 늘려서 2~3단계를 반복합니다.
- 더 이상의 실험이 필요 없다면, canary subset에 traffic이 전달되지 않도록 한 뒤 canary subset을 삭제합니다.
이제 본격적으로 위 2가지의 배포를 지원하도록 Helm charts를 생성하고 Spinnaker pipeline을 제작한 내용을 공유해드리겠습니다.
Helm Chart & Istio
지난 글에서 언급했듯이, Hyperconnect에서는 2개의 Helm charts를 사용하고 있습니다. 하나는 Deployment, StatefulSet 등 workload를 생성하기 위한 chart이고, 나머지 하나는 service mesh에 관련된 설정을 생성하기 위한 chart입니다. 여러 종류의 설정이 생성되지만, canary 배포에 관련된 Kubernetes objects는 Service, DestinationRule, Gateway, VirtualService의 4개입니다.
Service, DestinationRule & Gateway
제일 먼저, 평범한 Kubernetes의 Service object[4]입니다. 특별한 설명이 필요 없이, app: hello-app label을 가지고 있는 모든 Pod을 묶습니다.
apiVersion: v1
kind: Service
metadata:
  name: hello-app
spec:
  selector:
    app: hello-app
  ports:
    - name: http-hello-app
      port: 80
      targetPort: 8080
      protocol: TCP
다음으로, Istio의 DestinationRule object[5]입니다. hello-app의 subset을 추가로 지정하고, 이 subset을 VirtualService object[6]에 사용 할 수 있습니다. 아래 DestinationRule은 3개의 subset (main, baseline, canary)을 정의합니다. hpcnt.com/app-role: main label을 가지고 있는 Pod은 main subset에, hpcnt.com/app-role: canary label을 가지고 있는 Pod은 canary subset에 대응됩니다.
apiVersion: networking.istio.io/v1alpha3
kind: DestinationRule
metadata:
  name: hello-app
spec:
  host: hello-app
  subsets:
    - name: main
      labels:
        hpcnt.com/app-role: main
    - name: baseline
      labels:
        hpcnt.com/app-role: baseline
    - name: canary
      labels:
        hpcnt.com/app-role: canary
마지막으로 Istio의 Gateway object[7]입니다. Istio mesh 밖에서 traffic이 들어올 수 있도록 istio-ingressgateway[8]와 연결합니다.
apiVersion: networking.istio.io/v1alpha3
kind: Gateway
metadata:
  name: hello-app
spec:
  selector:
    istio: ingressgateway
  servers:
    - port:
        name: http
        number: 80
        protocol: HTTP
      hosts:
        - hello-app.hyperconnect.com
위의 세 objects는 아래 VirtualService objects에서 참조하지만, 보통 한 번 배포하면 변경할 일이 없어 위 값으로 고정됩니다.
VirtualService
Istio VirtualService object에서는 다양한 방법으로 routing을 제어 할 수 있습니다. 특정 ingress gateway, http host, path나 header가 일치하는 traffic만 별도로 routing 규칙을 지정 할 수도 있습니다. Route 결과로 static 한 http code (ex: 404)를 반환할 수도 있고, 여러 destination 중 랜덤으로 한 개의 destination에 전송하여 그 결과를 반환할 수도 있습니다. weight를 부여하여 가중치 있는 random destination으로 traffic을 전송하는 기능을 사용하여 아래와 같이 canary 배포를 구성 할 수 있습니다.
아래 설정에서는 2개의 VirtualService를 정의합니다. 위의 VirtualService는 .spec.gateways 필드가 없어 mesh 내부에서 통신할 때 적용되며, main subset에 98%, baseline 및 canary subset에 각각 1%씩 traffic을 전송합니다. 반면 아래 VirtualService는 .spec.gateways 필드가 hello-app으로 한정되어 있어, Istio ingressgateway를 통해 들어오는 mesh 외부 traffic에만 적용되며, main group에 90%, baseline 및 canary subset에 각각 5%씩 traffic을 전송하게 됩니다.
apiVersion: networking.istio.io/v1alpha3
kind: VirtualService
metadata:
  name: hello-app
spec:
  hosts: [hello-app]
  http:
    - route:
        - destination:
            host: hello-app
            subset: main
          weight: 98
        - destination:
            host: hello-app
            subset: baseline
          weight: 1
        - destination:
            host: hello-app
            subset: canary
          weight: 1
---
apiVersion: networking.istio.io/v1alpha3
kind: VirtualService
metadata:
  name: hello-app-external
spec:
  hosts: ["*"]
  gateways: [hello-app]
  http:
    - route:
        - destination:
            host: hello-app
            subset: main
          weight: 90
        - destination:
            host: hello-app
            subset: baseline
          weight: 5
        - destination:
            host: hello-app
            subset: canary
          weight: 5
특별한 이유가 없다면, mesh 외부에서 들어오는 traffic과 내부에서 routing 되는 traffic을 다르게 둘 필요가 없어 VirtualService 자체는 분리하되 weight는 동일하게 부여했습니다. 글의 맨 처음 Objective 단락에서 언급한 대로 Canary Deploy와 Canary Test를 동시에 지원하기 위해 다음과 같이 Helm chart를 구성했습니다.
- Canary Test의 경우,
canaryTest를true로,canaryWeight를 canary subset에 넣을 traffic %로 설정하도록 합니다. 이렇게 하면, 첫 번째 if-statement에 의해 main과 canary subset에 각각 100-n%, n%의 traffic이 들어가게 됩니다. - Canary Deploy의 경우,
canaryTest를false로,canaryWeight를 canary subset에 넣을 traffic %로 설정하도록 합니다. 두 번째 else-if-statement에 의해 main과 baseline, canary subset에 100-2n%, n%, n%의 traffic이 들어가게 됩니다. - 기본값을
canaryTest는false로,canaryWeight는 0으로 설정하여 일반 배포 시 if-statement 이하의 내용이 적용되지 않도록 합니다.
spec:
  http:
    - route:
        - destination:
            host: {{ .Release.Name }}
            subset: main
        {{- if .Values.canaryTest }}
          weight: {{ sub 100 .Values.canaryWeight }}
        - destination:
            host: {{ .Release.Name }}
            subset: canary
          weight: {{ .Values.canaryWeight }}
        {{- else if gt (.Values.canaryWeight | int64) 0 }}
          weight: {{ sub 100 (mul 2 .Values.canaryWeight) }}
        - destination:
            host: {{ .Release.Name }}
            subset: baseline
          weight: {{ .Values.canaryWeight }}
        - destination:
            host: {{ .Release.Name }}
            subset: canary
          weight: {{ .Values.canaryWeight }}
        {{- endif }}
Pipeline - Canary Deploy
Pipeline이 너무 길어서 3단계로 나누어 설명하겠습니다. 2편에서 설명한 pipeline과 같이 보시면 더 좋습니다.
시작 부분
먼저, pipeline의 첫 부분은 다음과 같습니다.

Step 0. Configuration
현재 배포된 version과 canaryVersion 두 개를 받는다는 점을 제외하면 일반 배포 pipeline의 설정과 등일합니다.
Step 1. Build Image
Jenkins를 사용해서 canaryVersion의 Docker image를 빌드합니다. 2편에서 공유했던 build step과 동일합니다.
Step 2. (Bake) Deploy (Baseline|Canary) 1%
Baseline과 canary subset을 사용하기 위해, 먼저 각각의 Deployment를 생성합니다. 이전 글에서 보셨던 일반 배포의 Bake와 Deploy와 다음 차이점을 빼고 동일합니다.
- 각 subset의
Deployment이름은-baseline,-canary가 뒤에 붙습니다. - DestinationRule에서 언급한 데로, 각 subset의 Pod은
hpcnt.com/app-rolelabel을 가지고 있습니다. - replicaCount를 적당하게 설정합니다.
values.yaml에 설정된 replicaCount가 traffic 100%를 처리할 수 있기 때문에, baseline과 canary는add (div (mul .Values.replicaCount .Values.canaryWeight) 100) 1이면 적당할 것입니다. 이 수식을 Helm chart에 넣어 Spinnaker에서 별도로 계산할 필요가 없도록 만들었습니다.
Step 3. Bake 1% & Deploy 1%
Service와 Istio mesh objects가 들어 있는 chart를 rendering하고, deploy 합니다. 이 시점 이후 baseline과 canary subset에 1%씩 traffic이 유입됩니다.
Step 4. Judgment and Preconditions
Hyperconnect에는 두 가지 버전의 judgment를 사용하고 있습니다.
- 사람이 manual 하게 계속할지, 롤백할지 정하는 manual judgment입니다. 이 단계에 도달하면 Spinnaker UI에 선택 창이 뜹니다.
- Kayenta[8]를 사용하여 자동으로 judgment합니다. 자동으로 두 subset의 차이를 계산하여 계속할지 여부를 정합니다. 여러 개의 Prometheus metric을 가중치와 함께 사용 할 수 있는데, 이 글에서 다룰 내용은 아니라고 생각하여 생략하겠습니다.
어느 방법으로든 계속 진행할 것이라 결정되면, 이제 pipeline의 중간 단계로 넘어가게 됩니다. 반면, 중단할 것이라 결정되면, 2편에서 만들었던 일반 배포 pipeline을 입력받았던 이전 version으로 다시 실행합니다.
- main subset의
Deployment가 현재 상태와 관계없이 이전 version으로 완벽히 복원됩니다. Deployment가 배포 완료된 이후, IstioVirtualService가 main subset 100%로 배포되어 모든 traffic이 다시 이전 version의 Pod으로 유입됩니다.- 마지막으로, 2편에서는 생략했던 pipeline의 뒷부분을 실행 시켜 baseline, canary subset의
Deploymentreplica count를 0으로 만들어 리소스를 정리합니다.
중간 부분
중간 부분은 다음 단계를 %를 변경하여 계속합니다. (1%, 10%, 25%, …) 2편에서 만들어놓았던 pipeline 생성 도구를 사용하면 쉽게 만들 수 있습니다.

Step 5. Bake Deploy ~ Judgement n%
Step 2 ~ Step 4를 traffic %만 변경해서 반복합니다. 다만, 시작 부분과는 달리 main subset도 같이 배포합니다. 이제 main subset에는 100-2*n%의 traffic만 들어오기 때문에, add (div (mul .Values.replicaCount (sub 100 (mul 2 .Values.canaryWeight))) 100) 1의 replica count로 충분하기 때문입니다.
마지막 부분
마지막 50% 상태가 되면, baseline과 canary subset에 50%씩 traffic이 유입되며, main subset은 사용하지 않는 상태가 됩니다.

Step 6. Deploy New Version
2편에서 만들었던 일반 배포 pipeline을 입력받았던 신규 version으로 실행합니다.
- main subset의
Deployment를 신규 version으로 update합니다. 현재 main subset은 사용 중이지 않아 traffic에 아무 영향을 미치지 않습니다. - 그 다음, Istio
VirtualService가 main subset을 100% 사용하도록 배포되여 모든 traffic이 신규 version의 main subset으로 유입됩니다. - 마지막으로 롤백 상황과 동일하게 baseline과 canary subset을 0으로 scale-in 합니다.
Step 7. Manual Judgement New ~ Rollback at New
100% 배포가 끝나고 나서 문제가 발생했을 때 빠르게 롤백하기 위해 추가한 부분입니다. n% rollback과 동일합니다.
Auto Generation
이제, 2편에서 제작했던 pipeline 생성 도구를 사용하여 만들어보겠습니다. 내용이 방대하여 많은 부분을 편집했습니다.
stages:
  - refId: prepare
    name: "Prepare"
    requisiteStageRefIds: [build-canary]
    type: wait
    waitTime: 5

  {% for canary_weight in canary_weights %}  # canary_weights에 대해 반복하며 단계를 생성합니다. (1%, 10%, ..., 50%)
  {% set canary_loop = loop %}

  # 첫 번째 loop라면 main를 배포 할 필요가 없습니다.
  {% set roles = ["baseline", "canary"] if canary_loop.first else ["main", "baseline", "canary"] %}

  # 배포해야 하는 subset에 대해 다음 stage를 생성합니다.
  {% for role in roles %}
  # Bake and Deploy Baseline and Canary {{ canary_weight }}
  - refId: bake-deploy-{{ role }}-{{ canary_weight }} # 일부 생략
    name: "Bake Deploy {{ role | title }} {{ canary_weight }}"
    requisiteStageRefIds:
    {% if canary_loop.first %}
      - prepare
    {% else %}
      - preconditions-continue-{{ canary_weights[canary_loop.index0 - 1] }}
    {% endif %}
    type: bakeManifest
    expectedArtifacts: # 나머지 부분 생략
      - displayName: "{{ app_name }}-deploy-{{ role }}-{{ canary_weight }}"
    overrides:
      role: "{{ role }}" # main, baseline, canary subset을 생성합니다.
      # canary인 경우에만 신구 버전인 canaryVersion을 사용하고, 아닌 경우 version을 사용합니다.
      version: "{{ '${parameters[\\\"canaryVersion\\\"]}' if role == 'canary' else '${parameters[\\\"version\\\"]}' }}"
      # 현재 canary_weight
      canaryWeight: {{ canary_weights[canary_loop.index0 - 1] if role == "main" else canary_weight }}
  - refId: deploy-{{ role }}-{{ canary_weight }} # 일부 생략
    name: "Deploy {{ role | title }} {{ canary_weight }}"
    requisiteStageRefIds:
      - bake-deploy-{{ role }}-{{ canary_weight }}
    type: deployManifest
    manifestArtifactId: "{{ app_name }}-deploy-{{ role }}-{{ canary_weight }}"
  {% endfor %}
  # subset 배포가 완료되었습니다.

  # 이제 Istio 설정을 배포합니다.
  # Bake and Deploy {{ canary_weight }}
  - refId: bake-service-{{ canary_weight }} # 일부 생략
    name: "Bake {{ canary_weight }}%"
    requisiteStageRefIds:
      {% for role in roles %}
      - deploy-{{ role }}-{{ canary_weight }}
      {% endfor %}
    type: bakeManifest
    expectedArtifacts: # 나머지 부분 생략
      - displayName: "{{ app_name }}-service-{{ canary_weight }}"
    overrides:
      canaryWeight: {{ canary_weight }} # 중요: canary_weight를 설정합니다.
  - refId: deploy-service-{{ canary_weight }} # 일부 생략
    name: "Deploy {{ canary_weight }}%"
    requisiteStageRefIds:
      - bake-service-{{ canary_weight }}
    type: deployManifest
    manifestArtifactId: "{{ app_name }}-service-{{ canary_weight }}"

  # Auto Judgment {{ canary_weight }}%
  - refId: judgment-{{ canary_weight }}  # 나머지 부분 생략
    name: "Auto Judgment {{ canary_weight }}%"

  # 실패한 경우 rollback합니다.
  - refId: preconditions-rollback-{{ canary_weight }}
    name: "Preconditions: Rollback"
    requisiteStageRefIds:
      - judgment-{{ canary_weight }}
    type: checkPreconditions
    preconditions:
      - context:
          expression: "${ #stage(\"Auto Judgment {{ canary_weight }}%\").status.isFailure() }"
        failPipeline: false
        type: expression
  - refId: pipeline-rollback-{{ canary_weight }}
    name: "Rollback at {{ canary_weight }}%"
    requisiteStageRefIds:
      - preconditions-rollback-{{ canary_weight }}
    type: pipeline
    application: "{{ app_name }}"
    pipeline: "" # 2편에서 만든 일반 배포 pipeline의 id입니다
    pipelineParameters:
      version: "${parameters[\"version\"]}" # 이전 버전으로 trigger합니다.
      branch: "${parameters[\"branch\"] ?: \"master\"}"
      disableCanaryDeploy: "true" # 일반 배포에서는 사용할 일이 없었던 baseline, canary subset을 삭제하는 stage가 실행되도록 합니다.

  # 성공한 경우 다음으로 계속 진행합니다.
  - refId: preconditions-continue-{{ canary_weight }}
    name: "Preconditions: Continue"
    requisiteStageRefIds:
      - judgment-{{ canary_weight }}
    type: checkPreconditions
    preconditions:
      - context:
          expression: "${ #stage(\"Auto Judgment {{ canary_weight }}%\").status.isFailure() == false }"
        failPipeline: false
        type: expression
  {% endfor %}
  # 이제 canary_weight=50%인 상황입니다.

  - refId: pipeline-deploy-new
    name: "Deploy New Version"
    requisiteStageRefIds:
      - preconditions-continue-50
    type: pipeline
    application: "{{ app_name }}"
    pipeline: "" # 2편에서 만든 일반 배포 pipeline의 id입니다
    pipelineParameters:
      version: "${parameters[\"canaryVersion\"]}" # 이제 신규 버전을 사용합니다.
      branch: "${parameters[\"branch\"] ?: \"master\"}"
      disableCanaryDeploy: "true" # 일반 배포에서는 사용할 일이 없었던 baseline, canary subset을 삭제하는 stage가 실행되도록 합니다.
Pipeline - Canary Test
조금씩 traffic percentage를 올려서 완전히 배포해야 하는 Canary Deploy pipeline과는 다르게, 사람이 완전히 제어해야 하는 Canary Test pipeline은 상당히 간단합니다.

Step 0. Configuration
테스트할 canaryVersion, replica 숫자를 직접 조절 할 수 있는 canaryReplica, traffic %를 지정 할 수 있는 canaryWeight를 추가로 받습니다. canaryWeight의 값에 따라, 2갈래로 분기됩니다.
Case A: Canary Create
Step 1. Build Image
Jenkins를 사용해서 canaryVersion의 Docker image를 빌드합니다. 2편에서 공유드렸던 build step과 동일합니다.
Step 2. Bake Canary + Deploy
위 Canary Deploy pipeline과 거의 같습니다. 다만,
- main, baseline subset은 배포하지 않고 canary subset만 신규로 배포합니다.
- Helm charts를 사용하여 적절한
replicaCount를 계산하는 대신, 사용자가 입력한canaryCount를 그대로 사용합니다.
Case B: Canary Destroy
Step 1. Destroy
2편에서 만들었던 pipeline을 trigger합니다. main subset을 수정하지 않았으므로 다시 배포할 필요가 없고, Istio mesh config만 다시 배포하여 모든 traffic이 main subset을 사용하게 합니다. 그 후, canary subset을 삭제합니다.
Auto Generation
Canary Deploy와 마찬가지로 2편에서 제작했던 pipeline 생성 도구를 사용하여 만들어보겠습니다. 내용이 방대하여 많은 부분을 편집했습니다.
parameterConfig:
  - name: canaryVersion
    label: Canary Version
    required: true
    default: ""
  - name: canaryReplica
    label: Canary Replica
    required: true
    default: "1"
  - name: canaryWeight
    label: Canary Weight
    required: true
    default: "1"
  - name: branch
    label: Branch
    required: true
    default: "{{ default_branch }}"
stages:
  # Case B: destroy canary - canaryWeight를 0으로 하면, traffic을 보내지 않도록 하고 canary subset을 삭제합니다.
  - refId: preconditions-canary-destroy
    name: "Preconditions: Canary Destroy"
    requisiteStageRefIds: []
    type: checkPreconditions
    preconditions:
      - context:
          expression: "${ #toInt(parameters[\"canaryWeight\"]) == 0}"
        failPipeline: false
        type: expression
  - refId: pipeline-canary-destroy
    name: "Destroy Canary"
    requisiteStageRefIds:
      - preconditions-canary-destroy
    type: pipeline
    application: "{{ app_name }}"
    pipeline: "" # 2편에서 만든 일반 배포 pipeline의 id입니다
    pipelineParameters:
      skipDeploy: "true" # 일반 배포의 모든 단계를 건너띄고, 마지막 baseline, canary subset만 삭제하도록 합니다.
      disableCanaryDeploy: "true" # 일반 배포에서는 사용할 일이 없었던 baseline, canary subset을 삭제하는 stage가 실행되도록 합니다.

  # Case A: deploy canary - canaryWeight을 0보다 크게 하면, canary subset을 배포하고 해당 % 만큼 traffic을 보냅니다.
  - refId: preconditions-canary-start
    name: "Preconditions: Canary Start"
    requisiteStageRefIds: []
    type: checkPreconditions
    preconditions:
      - context:
          expression: "${ #toInt(parameters[\"canaryWeight\"]) > 0}"
        failPipeline: false
        type: expression
  - refId: build-canary # canary 이미지를 빌드합니다.
    name: Build Image
    requisiteStageRefIds:
      - preconditions-canary-start
    type: jenkins
    master: kube-jenkins-master
    job: "build..."
    parameters: {} # 생략

  # Bake and Deploy Canary
  - refId: bake-deploy-canary
    name: "Bake Deploy Canary"
    requisiteStageRefIds: [build-canary]
    type: bakeManifest
    expectedArtifacts:
      - displayName: "{{ app_name }}-deploy-canary"
    overrides:
      role: canary # canary subset을 생성합니다.
      replicaCount: "${parameters[\"canaryReplica\"]}" # 직접 replica count를 지정합니다.
      version: "${parameters[\"canaryVersion\"]}"
  - refId: deploy-canary
    name: "Deploy Canary"
    requisiteStageRefIds:
      - bake-deploy-canary
    type: deployManifest
    manifestArtifactId: "{{ app_name }}-deploy-canary"

  # Bake and Deploy Service
  - refId: bake-service
    name: "Bake Service"
    requisiteStageRefIds:
      - deploy-canary
    type: bakeManifest
    expectedArtifacts:
      - displayName: "{{ app_name }}-service"
    overrides:
      canaryTest: "true"
      # 사용자가 입력한 canary weight를 그대로 사용합니다.
      canaryWeight: "${parameters[\"canaryWeight\"]}"
  - refId: deploy-service
    name: "Deploy Service"
    requisiteStageRefIds:
      - bake-service
    type: deployManifest
    manifestArtifactId: "{{ app_name }}-service"
Wrap Up
- Istio를 사용하여 canary 배포나 테스트를 쉽게 할 수 있습니다.
- DevOps팀은 2편에서 만들었던 pipeline 제작 도구와 일반 배포 pipeline을 재활용하여 canary 배포를 지원하고 있습니다.
이상으로, microservice 배포 자동화에 대한 3편의 글이 모두 끝났습니다. 분량 관계상 많은 내용을 생략해서 아쉽지만, microservice 배포 자동화에 조금이나마 도움이 되었으면 좋겠습니다.
지금까지 3편에 걸친 긴 글 읽어주셔서 감사합니다 :)
언제나 글 마지막은 채용공고입니다. 이렇게 재미있는(?) 일을 같이할 DevOps와 Backend 개발자분들의 많은 지원 부탁드립니다. 채용공고 바로가기
References
[2] https://github.com/GoogleCloudPlatform/kubernetes-engine-samples/tree/master/hello-app
[3] https://github.com/kubernetes/autoscaler/tree/master/cluster-autoscaler
[4] https://kubernetes.io/docs/reference/generated/kubernetes-api/v1.18/#service-v1-core
[5] https://istio.io/latest/docs/reference/config/networking/destination-rule/
[6] https://istio.io/latest/docs/reference/config/networking/virtual-service/
[7] https://istio.io/latest/docs/reference/config/networking/gateway/
[8] https://istio.io/latest/docs/tasks/traffic-management/ingress/ingress-control/
Read more
-
1년 동안 Workload의 절반을 ARM64로 Migration하기
AWS에서는 ARM64 기반의 Graviton processor를 지원합니다. 가격도 저렴하고 성능도 좋은 Graviton을 production Kubernetes cluster에 도입하여, 1년 동안 50%의 workload를 전환한 경험을 공유합니다. -
JVM + Container 환경에서 수상한 Memory 사용량 증가 현상 분석하기
Resource 최적화를 진행하면서 Java container에 할당된 CPU를 줄이자, memory 사용량이 증가했습니다. 신기한(?) 현상을 분석해보았습니다. -
개발자의 AWS 권한을 GitOps로 우아하게 관리하는 방법
많은 개발자가 가지는 많은 권한을 쉽게 관리하고, 개발자가 필요한 권한을 직접 얻을 수 있게 권한 시스템을 설계하고 GitOps 기반 도구를 개발한 과정을 소개합니다. -
ImagePullSecrets 없이 안전하게 Private Registry 사용하기!
ImagePullSecrets 없이 편리하고 안전하게 private registry를 사용 할 수 있도록 Kubelet Credential Provider 기능을 실험해보았습니다.