Gerrit Code Review 도입하기
안녕하세요. 하이퍼커넥트 Slide & Metaverse Studio 의 백엔드 소프트웨어 엔지니어 이선엽입니다. 최근 팀 내에서 더욱 효율적인 코드 리뷰를 위해 Gerrit Code Review를 도입하였습니다. 이 글을 통해 이 과정에 대해 소개드리고자 합니다. 이 글에서 다룰 주제는 다음과 같습니다.
- Gerrit Code Review에 대한 간단한 소개
- Replication 설정의 필요성과 하이퍼커넥트 시스템에 적용할 경우 문제되는 점 소개
- SSH key 관리 문제
- Github actions 연동 문제
- Git Push 내부 구현 간단한 소개
- Helper SSH Server 추가하여 ssh key 관리 문제 해결 방법
- Git Pack Protocol Parser 구현
- Github Actions Trigger를 위한 API 서버 구현
- Github Actions Workflow 정의
- 적용 결과
Gerrit Code Review 란?

Gerrit Code Review (https://www.gerritcodereview.com/) 는 구글에서 개발한 코드리뷰 툴입니다. GitHub와 달리, commit 단위로 리뷰를 진행하며 점수를 -2, -1, 0, +1, +2로 줄 수 있습니다. +2를 받으면 Submit (merge) 할 수 있습니다. GitHub와 비교했을 때 다음과 같은 장단점을 가지고 있습니다.
Pros
- 메인 페이지 UI가 Your Turn [1], Outgoing reviews, Incoming reviews, CCed on, Recently closed로 구성되어있어서, 해야할 일을 바로 알 수 있습니다.
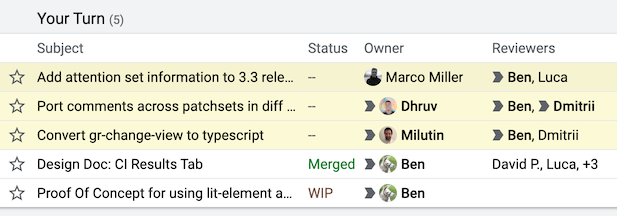
- 커밋 단위로 리뷰하므로 더 작은 조각을 리뷰하여 리뷰 피로도가 적고 빠른 피드백이 가능해집니다. 여기서 커밋을 patchset이라고 부르기도 합니다.
- commit끼리 dependency를 가질 수 있습니다.
-
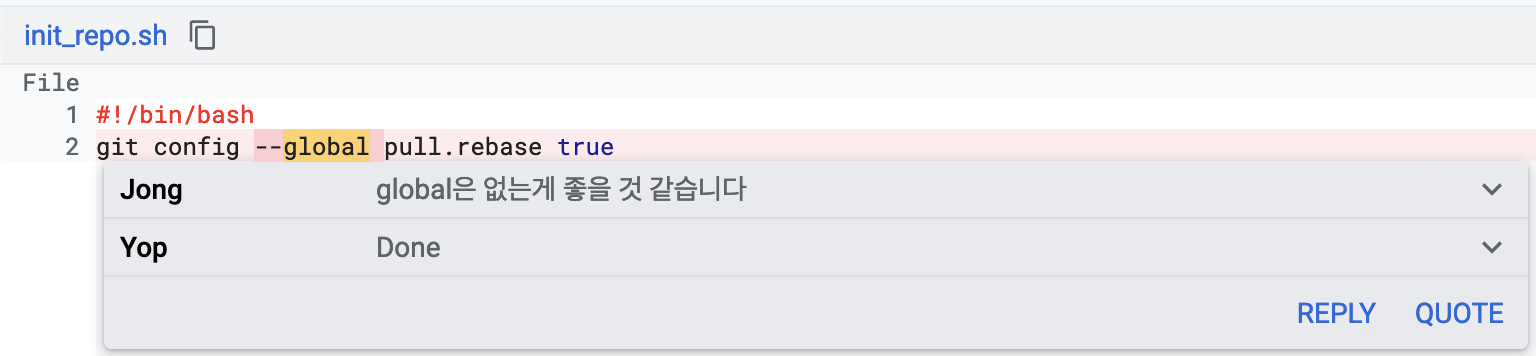
한 line 내에서도 특정 구간만 선택할 수 있어서 명확한 커뮤니케이션이 가능해집니다.
- Commit message, unchanged lines에도 리뷰할 수 있습니다.
- Relation chain / Submitted together UI를 통해 관련된 커밋을 보기 좋습니다.
Cons
- UI에 익숙해지는데 시간이 걸립니다.
- Remote branch를 잘 사용하지 않으므로, workflow가 달라집니다 (또한 익숙해져야합니다.) git을 merge가 아니라 rebase하는 방식으로 사용하게 됩니다.
- CI를 연동하기 어렵습니다. Gerrit Trigger 라는 플러그인이 있지만 Jenkins 전용이고, 하이퍼커넥트에서는 Github Actions를 주로 사용합니다. (하지만! 이 문제를 멋지게 풀어냈는데요, 잠시 후에 그 방법을 소개드리겠습니다.)
Replication 설정
기존에 사용하던 CI/CD 시스템이 github를 사용하도록 되어있으니, gerrit replication 플러그인 [2]을 설정하여 github로 커밋을 복제해야 합니다. 이렇게 하면 gerrit에 새 패치셋이 올라올 때마다 설정해둔 remote로 복제되어 commit hash로 참조할 수 있습니다.
[remote "gh-slide-test"]
      url = git@github:/hyperconnect/slide-test.git
      replicatePermissions = true
      createMissingRepositories = false
      projects = slide-test
      replicationDelay = 0
위와 같이 설정하면 slide-test 프로젝트에 업데이트가 발생할 경우, submit 전의 패치셋과 리뷰/점수 등의 metadata까지 git@host로 업데이트 됩니다. projects에 정규식과 url에 template을 사용하여 여러 프로젝트에 해당하는 세팅을 한번에 할 수도 있습니다. 이때 단일 key로 remote host에 접근하는 경우 간단하게 replication 설정이 가능하지만 하이퍼커넥트에서는 보안을 위해 repository마다 다른 deploy key를 사용하고 있고 주기적으로 key를 rotate 하고 있기 때문에 replication 설정 관리가 단일 key 사용에 비해 까다롭습니다. 이 deploy key들은 HashiCorp의 시크릿 관리 엔진인 vault를 이용하여 관리하고 있습니다.
문제를 정리하면 다음과 같습니다.
- Repository마다 다른 ssh key를 사용할 경우, replication에 사용할 key를 repository마다 일일히 다 세팅해줘야합니다. 따라서 repository 추가 등 운영이 불편합니다.
- CI를 이용해 리뷰-타임 테스트를 돌리기 어렵습니다. Github Actions에서는
on: push를 지원하지만, branch와 tag push만 지원합니다 (패치셋의 refspec은refs/changes/를 사용합니다.) Jenkins에는 Gerrit Trigger를 이용하면 되지만 우리는 Github Actions를 쓰고 싶습니다!
그러고보니 모두 git push에 관한 문제입니다. 그리고 이어서 다음 질문이 떠올랐습니다. (1, 2번 모두 gerrit plugin을 개발하면 해결할 수 있지만… 저는 자바 개발을 하고 싶지 않았습니다.)
Git push는 어떻게 구현되어 있을까요?
git은 http/git/ssh 등의 다양한 transport를 이용하여 remote와 통신하는 것으로 알려져 있습니다. 하이퍼커넥트에서는 주로 ssh를 사용하는데요, 잘 아시다시피 ssh는 원격 컴퓨터에 접속하여 명령어를 실행하기 위한 프로토콜입니다. 그렇다면 git push는 무슨 명령어를 실행할까요? 그 명령어는 바로 git-receive-pack 입니다.
$ ssh git@host git-receive-pack /hyperconnect/slide-test.git
위처럼 git-receive-pack의 인자로 git dir을 전달하여 실행한 뒤, stdin, stdout과 stderr을 통해 통신하여 필요한 정보를 교환합니다. [3]
그렇다면 Helper Server를 구축하면 어떨까요?
기존의 replication 방식은 다음과 같습니다.
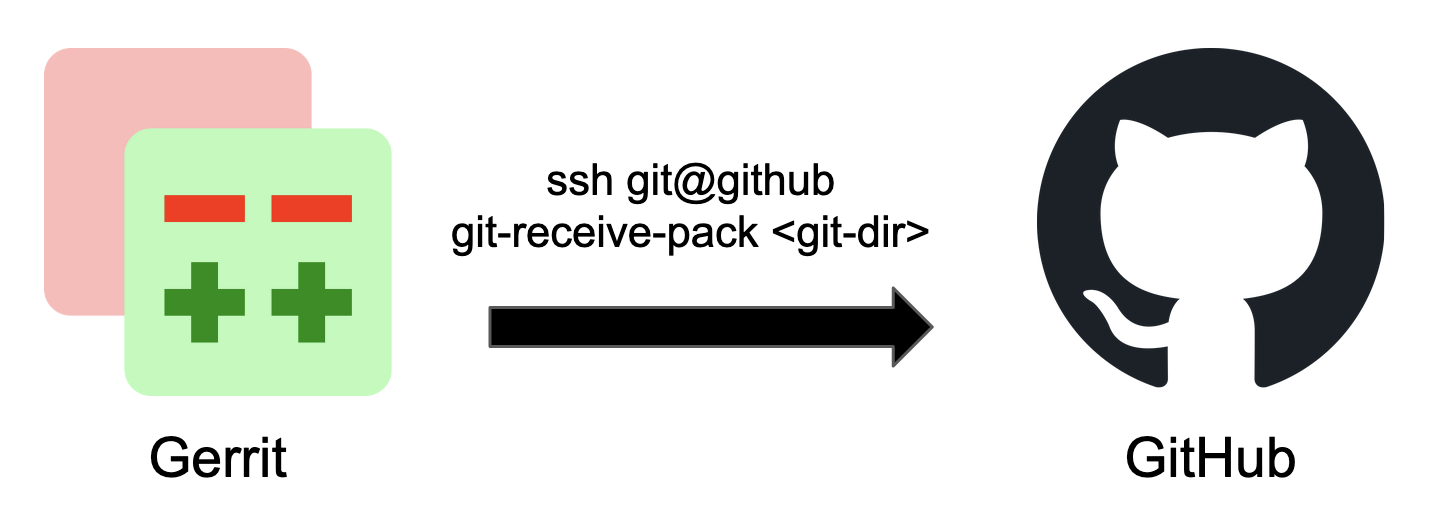
여기서 Gerrit이 GitHub로 바로 접근하는 대신, 다음과 같이 helper server를 추가할 수 있습니다.
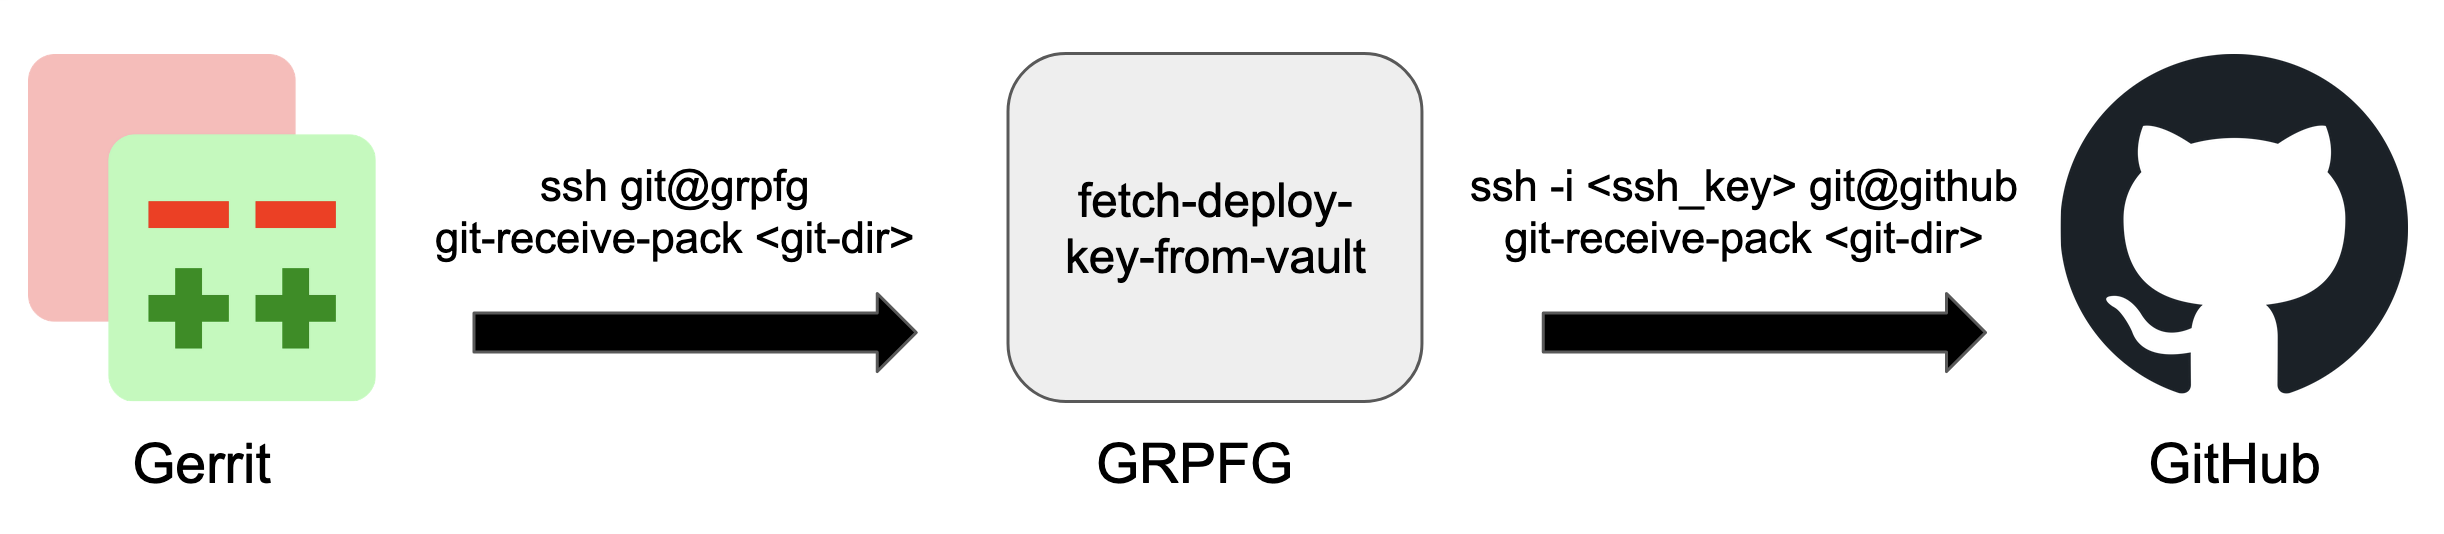
중간에 git-receive-pack-for-gerrit (GRPFG)라는 이름의 helper ssh 서버를 추가했습니다. grpfg를 gerrit의 sidecar로 설정하여 gerrit과 grpfg의 인증을 간편하게 처리하고, grpfg에는 /usr/bin/git-receive-pack을 추가하여 필요한 deploy key를 가져와 github로 전달해주도록 할 수 있습니다. /usr/bin/fetch-ssh-key 에는 주어진 git-dir에 맞는 deploy key를 vault로부터 가져오도록 스크립팅 되어있습니다. gerrit의 경우 replication 전에 git-upload-pack 명령을 이용해 remote의 상태를 확인하기도 하는데, git-receive-pack과 같은 방식으로 구현하면 됩니다.
#!/bin/bash
set -e
ssh_key_path=$(fetch-ssh-key "$@")

if [[ -z "${ssh_key_path}" ]]; then
  echo "fetch-ssh-key fail" >&2
  exit 1
fi

exec ssh -i "${ssh_key_path}" git@github git-receive-pack "$@"
이렇게 시스템에 git-receive-pack을 준비해둔 뒤 ssh 서버를 열고 remote를 세팅한 뒤 git push를 하면 위 스크립트가 실행되고, vault로부터 가져온 deploy key를 이용해 github에 ssh 연결을 하여 stdin, stdout, stderr을 터널링합니다. 이렇게 1번 문제는 shell script를 약간 코딩하는 것으로 해결되었습니다.
[remote "gh"]
      url = ssh://git@localhost:2222/${name}.git
      replicatePermissions = true
      createMissingRepositories = false
      projects = hyperconnect/*
      replicationDelay = 0
그리고 replication.config를 위와 같이 업데이트하였습니다. 이제 replication.config의 변경 없이 repository를 마구 추가할 수 있습니다!
이제 github actions를 연동하는 작업이 남았는데요, git 공식 프로토콜 [3]에는 다음과 같은 스펙이 있습니다.
Report Status
-------------

After receiving the pack data from the sender, the receiver sends a
report if 'report-status' or 'report-status-v2' capability is in effect.
It is a short listing of what happened in that update.  It will first
list the status of the packfile unpacking as either 'unpack ok' or
'unpack [error]'.  Then it will list the status for each of the references
that it tried to update.  Each line is either 'ok [refname]' if the
update was successful, or 'ng [refname] [error]' if the update was not.

----
  report-status     = unpack-status
		      1*(command-status)
		      flush-pkt

  unpack-status     = PKT-LINE("unpack" SP unpack-result)
  unpack-result     = "ok" / error-msg

  command-status    = command-ok / command-fail
  command-ok        = PKT-LINE("ok" SP refname)
  command-fail      = PKT-LINE("ng" SP refname SP error-msg)

  error-msg         = 1*(OCTET) ; where not "ok"
----
따라서, git pack-protocol parser를 구현하여 github 서버에서 내려준 response를 분석하면 어떤 refspec이 업데이트 되었는지 알 수 있고, 그 정보를 github actions로 전달하여 smoke test를 돌릴 수 있습니다.
Git Pack-Protocol Parser 만들기

제가 굉장히 좋아하고 static 바이너리를 뽑기 좋은 Rust를 이용하여 파서를 개발하기로 결정했습니다. Rust에는 nom 이라는 훌륭한 parser combinators library가 있는데요. 이 라이브러리를 이용하여 report-status-v2 결과를 파싱하는 코드를 구현했습니다.
fn read_command_ok(buf: &[u8]) -> IResult<&[u8], &str> {
    let (buf, pkt_line) = read_pkt_line(buf)?;
    let (unverified_refname, _) = tag(b"ok ")(pkt_line)?;
    let (pkt_line, refname) = verify_refname(unverified_refname)?;
    eof(pkt_line)?;
    Ok((buf, refname))
}

fn read_command_ok_v2(buf: &[u8]) -> IResult<&[u8], CommandStatus> {
    let (mut buf, refname) = read_command_ok(buf)?;
    if let Ok(output) = many0(read_option_line)(buf) {
        buf = output.0;
    }
    Ok((buf, CommandStatus(refname, None)))
}

fn read_command_status_v2(buf: &[u8]) -> IResult<&[u8], CommandStatus> {
    alt((read_command_ok_v2, read_command_fail))(buf)
}

fn read_report_status_v2(buf: &[u8]) -> IResult<&[u8], Vec<CommandStatus>> {
    let (buf, _) = read_unpack_status(buf)?;
    let (buf, command_statuses) = many1(read_command_status_v2)(buf)?;
    let (buf, _) = read_flush_pkt(buf)?;
    let (buf, _) = eof(buf)?;
    Ok((buf, command_statuses))
}
그리고 파싱 결과를 전달받아 커맨드를 실행하도록 합니다.
fn on_command_ok(&self, refname: &str) {
    log::info!("command_ok: {}", refname);

    let result = std::process::Command::new("grpfg-command-ok")
        .args([&self.opt.git_dir, refname])
        .spawn();

    match result {
        Ok(mut child) => {
            log::debug!("spawned process grpfg-command-ok: {}", child.id());
            if let Err(err) = child.wait() {
                log::error!("could not wait process grpfg-command-ok: {}", err);
            }
        }
        Err(err) => {
            log::error!("could not spawn process grpfg-command-ok: {}", err);
        }
    }
}
그리고 grpfg-command-ok 명령어를 준비해줍니다. 여기서 바로 github actions를 트리거 할 수도 있겠지만, access token을 캐싱하여 효율적으로 사용하기 위해 간단한 http 기반 api 서버를 개발하기로 하고 curl로 처리를 하였습니다.
#!/bin/bash
set -e
exec >&2
echo grpfg-command-ok: "$@"

git_dir="$1"
refspec="$2"
re_changes_refspec="^refs/changes/[0-9]+/[0-9]+/[0-9]+"

if [[ "${refspec}" =~ ${re_changes_refspec} ]]; then
    curl -s localhost:8000/v1/trigger_workflow_dispatch -d "git_dir=${git_dir}&refspec=${refspec}"
fi
이제 git-receive-pack을 수정하여 ssh 서버의 응답을 parser로 전달해주면 됩니다.
#!/bin/bash
set -e
ssh_key_path=$(fetch-ssh-key "$@")

if [[ -z "${ssh_key_path}" ]]; then
  echo "fetch-ssh-key fail" >&2
  exit 1
fi

exec 3>&1
grpfg -i "${ssh_key_path}" "$@" 2>&1 1>&3 | tee /dev/stderr >> grpfg_error_log
ret=${PIPESTATUS[0]}
exec 3>&-
exit ${ret}
Github Actions Trigger를 위한 API 서버 만들기
Rust에는 훌륭한 macro 시스템이 있고, 이를 이용해 아름다운 코드로 HTTP API 서버를 만들 수 있는 프레임워크들이 많이 있습니다. 이번에는 Rocket 이 0.5.0-rc1에서 async handler를 지원하여 rocket을 사용해보았습니다. 또한 GitHub API에 사용할 token을 발급하고 관리해주는 라이브러리인 octocrab 을 이용하여 workflow_dispatch API를 호출하도록 하였습니다. octocrab은 표준 API endpoint에서 앱인증이 안되는 버그가 있었으나, 현재는 하이퍼커넥트에서 PR을 제출하여 머지된 상태입니다.
#[derive(rocket::FromForm)]
struct TriggerWorkflowDispatchInput<'r> {
    git_dir: &'r str,
    refspec: &'r str,
}

#[rocket::post("/trigger_workflow_dispatch", data = "<input>")]
async fn trigger_workflow_dispatch(
    input: Form<TriggerWorkflowDispatchInput<'_>>,
) -> Result<rocket::response::status::Custom<String>, String> {
    let api = octocrab_instance();
    let mut sanitized_git_dir = input.git_dir.trim_start_matches('/');
    if let Some(s) = sanitized_git_dir.strip_suffix(".git") {
        sanitized_git_dir = s
    }
    let route = format!(
        "repos/{}/actions/workflows/grpfg.yml/dispatches",
        sanitized_git_dir,
    );
    let url = api.absolute_url(&route).map_err(|e| format!("{}", e))?;
    let gh_response = api
        ._post(
            url,
            Some(&json!({
                "ref": "grpfg",
                "inputs": {
                    "refspec": input.refspec,
                },
            })),
        )
        .await
        .map_err(|e| format!("{}", e))?;

    let status = rocket::http::Status {
        code: gh_response.status().as_u16(),
    };

    let body = gh_response.text().await.map_err(|e| format!("{}", e))?;

    Ok(rocket::response::status::Custom(status, body))
}
Github Actions Workflow 정의하기
이제 gerrit에 패치셋을 올리면 커밋이 git-receive-pack-for-gerrit를 통해 github로 복제됩니다. 그리고 github에서 내려준 응답을 분석해 업데이트된 refspec을 가지고 Github Actions의 workflow를 trigger합니다. 이번에는 마지막 단계로 Github Actions에서 실행될 workflow를 정의해주어야합니다.
on:
  workflow_dispatch:
    inputs:
      refspec:
        type: string
        required: true
일단 workflow_dispatch를 통해 트리거할 수 있음을 정의함과 동시에 refspec이라는 인풋을 받도록 했습니다. 그리고 입력 받은 refspec을 이용해 checkout합니다.
- name: Checkout Repository
  uses: actions/checkout@v2
  with:
    ref: ${{ github.event.inputs.refspec }}
그리고 smoke test를 실행하는 코드를 작성합니다. 실행 결과에 따라 gerrit에 Success 혹은 Failure 메시지와 함께 Verified Label을 부여합니다.
build_url="https://github.com/${{github.repository}}/actions/runs/${{github.run_id}}"
patchset_commit="$(git rev-parse HEAD)"
git submodule update --init

if ./smoke_test.sh; then
  command="gerrit review ${patchset_commit} --message 'Success: ${build_url}' --label Verified=+1"
  exit_code=0
else
  command="gerrit review ${patchset_commit} --message 'Failure: ${build_url}' --label Verified=-1"
  exit_code=1
fi
ssh -p 29418 gerrithost ${command}
exit "${exit_code}"
Gerrit에는 Verified Label [4]을 추가합니다.
[label "Verified"]
      function = MaxWithBlock
      value = -1 Fails
      value = 0 No score
      value = +1 Verified
      copyAllScoresIfNoCodeChange = true
적용 결과
메인 페이지에서 각 체인지의 테스트 결과를 한번에 볼 수 있습니다.

- 이로써, 제가 patch set을 업로드하면
- gerrit이 git-receive-pack-for-gerrit의 git-receive-pack을 호출하고
- 그 커밋이 github에서 처리되어 refspec이 업데이트 되었다는 응답을 내려주어
- 제 parser가 그 응답을 분석하여 github actions를 호출한 결과
-
smoke test가 실행돼 성공하여 Verified +1과 코멘트가 달린 모습을 확인할 수 있습니다.

이렇게 gerrit을 위한 전용 ssh 서버를 만들어보았는데요. 덕분에 git의 구조와 git protocol에 대해 더욱 깊게 알 수 있었습니다. 그리고 이렇게 만들어진 grpfg 덕분에 gerrit을 더 많은 repository에 쉽게 적용할 수 있게 되었습니다. 마지막으로 grpfg가 열심히 smoke test를 돌리고 있는 모습을 보니 뿌듯하네요.
마무리는 채용공고입니다. 하이퍼커넥트에 오시면 이런 재밌고 챌린징한 일들을 함께 하실 수 있습니다! 많은 지원 부탁드립니다. https://career.hyperconnect.com/
References
[1] https://gerrit-review.googlesource.com/Documentation/user-attention-set.html
[3] https://github.com/git/git/blob/master/Documentation/technical/pack-protocol.txt
[4] https://gerrit-review.googlesource.com/Documentation/config-labels.html#label_Verified
Read more
-
Kubernetes 환경에서 Segmentation Fault 트러블슈팅하기 (Feat. Fluent Bit Contribution)
Kubernetes 환경에서 돌아가는 프로그램에서 segmentation fault가 났을 때 트러블슈팅하는 방법에 대해 다룹니다.